Archive

Yearly Archives: 2012

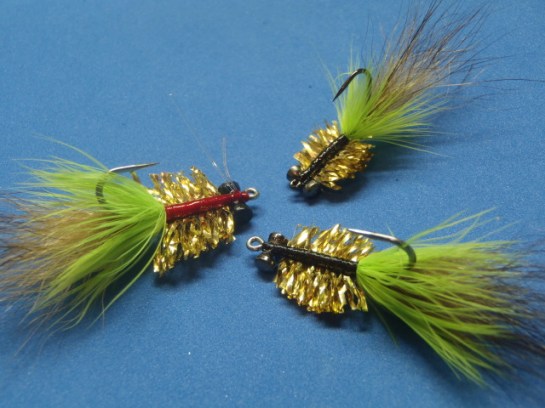
A little late for April’s fly tying segment, but I don’t think anyone will mind. Blake did a step by step on the fly that I had success with back in early April. I had no idea what it was called then, but we found out it’s true name and that it was originally tied by Johnny Miller and is available through Umpqua. This is Blake’s version. It is a killer fly for redfish.

Materials:

–          Mustad 34007 Size 2

–          Raccoon Tail

–          Saddle Hackle

–          Gold Mylar Tubing, Small

–          Dumbbell Eyes

Step 1. Start thread and put down a good base from the eye to somewhere near above the barb. I like to put a layer of super glue on the thread wraps for some extra security.

OLYMPUS DIGITAL CAMERA

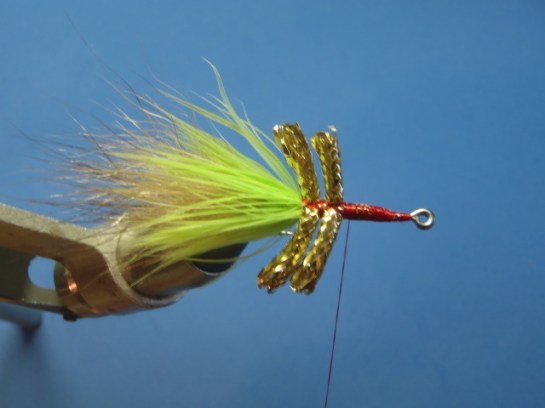
Step 2. Cut a clump of raccoon fur and tie it in for the tail. Comb out some of the under fur so that there isn’t too much material on the hook shank. Any tailing material would work.

OLYMPUS DIGITAL CAMERA

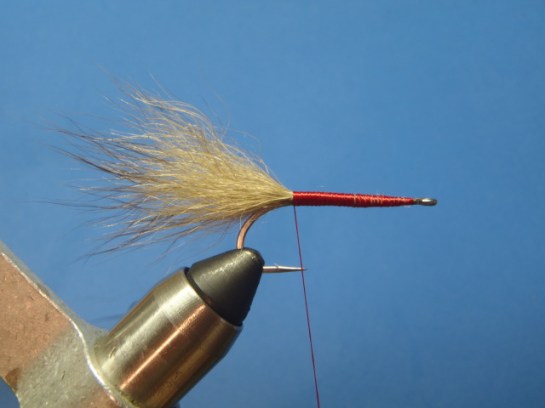
Step 3. Tie in a saddle hackle by the tip and palmer it in close touching turns up the shank. Try to get the feather to lay back towards the tail by pulling the barbs back before each wrap. Tie down the stem and tidy up the shank. I like to wrap all the materials to a spot right behind where my dumbbell eyes will be tied in.

OLYMPUS DIGITAL CAMERA

Step 4. Bring thread right in front of the hackle and tie in the first section of gold tubing. The tubing I used comes with a synthetic core that needs to be removed before tying it in. I cut sections of tubing about 3/4” long for this fly. The length of the tubing sections depends on the shape that you want to trim them. I like to minimize the amount of waste. Repeat this step 3 more times. (or more, all depends on how long you want your body). Make sure to tie it in using figure eight wraps.

OLYMPUS DIGITAL CAMERA

OLYMPUS DIGITAL CAMERA

OLYMPUS DIGITAL CAMERA

OLYMPUS DIGITAL CAMERA

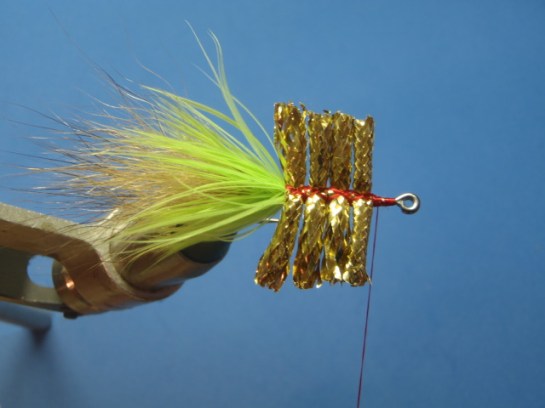
Step 5. Tie in dumbbell eyes in front of the tubing. Hopefully, there is enough room left over to tie in a week guard if you want one.

OLYMPUS DIGITAL CAMERA

Step 6. Tie in a weed guard if you want one. Whip finish and part off the thread.

OLYMPUS DIGITAL CAMERA

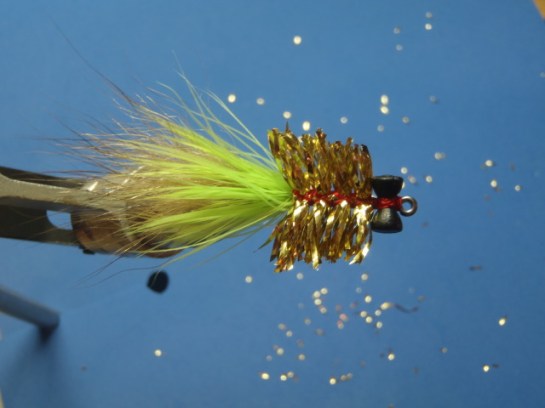
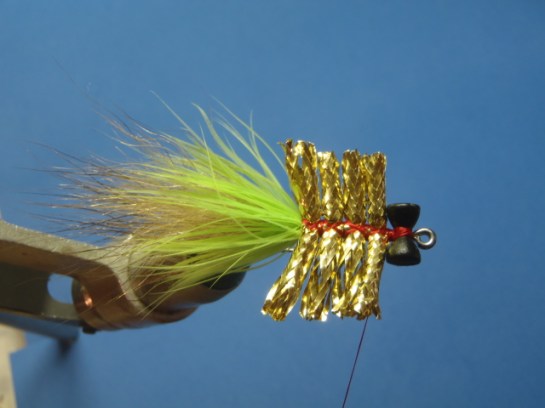
Step 7. Trim the tubing on either side to whatever shape you want then tease out the braid of the tubing. I like to do either an oval or on an angle from front to back.

Before:

OLYMPUS DIGITAL CAMERA

After:

OLYMPUS DIGITAL CAMERA

I like to cover all the exposed thread with a good coating of hard as nails to protect it from teeth. Makes for a more durable fly. Enjoy.

OLYMPUS DIGITAL CAMERA

OLYMPUS DIGITAL CAMERA

OLYMPUS DIGITAL CAMERA

The sky was on fire yesterday evening as the sun set on the storm clouds surrounding Baton Rouge. I’ve never seen such a variety of color strewn about the sky on a day that was majority gray. It was a pretty awesome sight to see. I tried to capture it as best I could with my Pentax Optio, but a DSLR would have been great to have.

IMG_0124

IMG_0125

IMG_0126

IMG_0127

IMG_0128

I had documented this process on the Cuda prior to the last IFA event, but I deleted all the pictures off my camera before the tournament since it wass catch-photo-release and I wanted to give the judges a clean card to look through. So today I had it all planned out, I would film and document what it takes to install the mesh cargo panels on the Coosa. You can pick these up at your local Jackson dealer or through their online store. Well I filmed it, but it was too dark (I was in a poorly lit garage while it rained), so the film came out lousy. Then the install was so easy that I failed to take pictures of all the steps because I just breezed right through. Definitely a one beer job.

Here goes what I do have.

First, gather the materials you’ll need to install them. That includes the boat. You’ll need a drill, 3/16 drill bit, hand riveter (essential tool for kayak anglers), and the mesh cargo panels (which come with the rivets and clips needed to hold the net in place). Some folks will use marine goop as well to seal each rivet hole, but I don’t think it is necessary with the location of these holes.

IMGP7129

IMGP7130

Drill holes in the appropriate locations for your boat. For the Cuda it is 5 spots, pretty straight forward. After you drill the holes you can rivet the clips into place. Make sure to press firmly against the kayak while you do. Keep squeezing that handle until you hear it pop.

IMGP7138

4 holes for the Coosa, and you actually need to place the holes for the top clips on top the boat, so it doesn’t interfere with the low position spot of the seat. Also watch when you are drilling the lower holes to not hit the flush mount rod holders.

IMGP7134

IMGP7133

Then all you have to do is stretch the mesh net over the clips

IMGP7140

IMGP7132

IMGP7143

See, I told you it was easy. If I can do it, you can do it.