Archive

Fishing


You may have noticed throughout the year that some of my fish pictures had a little card identifying my participation in an eight month long catch-photo-release tournament:

token

The tournament, put on by Bayou Coast Kayak Fishing Club and Massey’s Outfitters, was free for club members to participate in and ran from March 1st through October 31st. It consisted of seven categories over two divisions:

  • Conventional Rod and Reel Division

    • Speckled Trout
    • Redfish
    • Flounder
    • Large Mouth Bass
  • Fly Rod Division

    • Speckled Trout
    • Redfish
    • Large Mouth Bass

What made this CPR tournament a little different was it’s point structure. Normally overall aggregate length wins in a slam tournament like this, but this one was different because each category was awarded a fixed amount of points. The goal was then to get the most points by trying to catch the longest fish in each category. This made each species just as important as the last and protected the tournament from being dominated by one really long catch. Each division would win a kayak so no division held more value over the other, both fly and conventional divisions would be competitive.

This tournament was a lot of fun to fish because it was so multifaceted. It lasted eight months, so my interest in kayak fishing was at an all time high during that time. There was potential in every trip to upgrade your standing and work your way to the top. It also highlighted species that I normally don’t focus on and really helped me to become a better angler for them. I made specific trips to fish for largemouth and intentionally fished for flounder – these things don’t normally happen and it was a lot of fun.

I didn’t do as well as I would have liked, getting 4th overall on the conventional side and 5th in the fly, but I was lucky enough to enter a fish in every category and being the only angler to do so the tournament organizers felt I deserved a special prize – a brand new Bending Branches Angler Pro paddle!

BCKFCawards(Photo credit: Brendan Bayard)

I also took home a $100 check for 4th, not bad for a free tournament! A big thanks to the fine folks at Massey’s for their generosity. The rest of the results are below:

Conventional Aggregate
1st Clayton Shilling
2nd Steve Lessard
3rd Mark Eubanks
4th Ben Roussel
5th Steve Neece

Fly Aggregate
1st Jonathan Craft
2nd Kevin Andry
3rd Glen Cormier

Youth Aggregate
Rory Craft
Big Trout
Donnie Elliot
Big Red
Lance Burgos
Big Flounder
Michael Drenski
Big Bass
Don Hallet

It took a number of trips to earn the 4th place finish as I was upgrading fish throughout the year, but I didn’t catch anything memorable until the IFA championship. That’s when I was able to get a 31″ red and a 22.5″ trout.

IMGP8371

IMGP8357

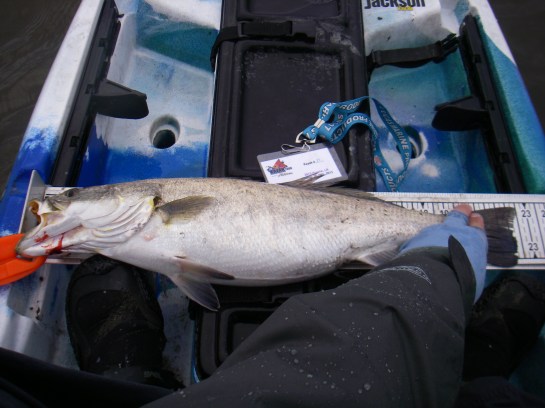
I was pretty disappointed that 31″ was the biggest red I could get because early in the year I had a few reds over 40″! At 22.5″ though, the trout may have been the biggest I’ve ever caught, so really stoked to have that fish to use for two different tournaments – the IFA championship and the Massey’s CPR tourney.

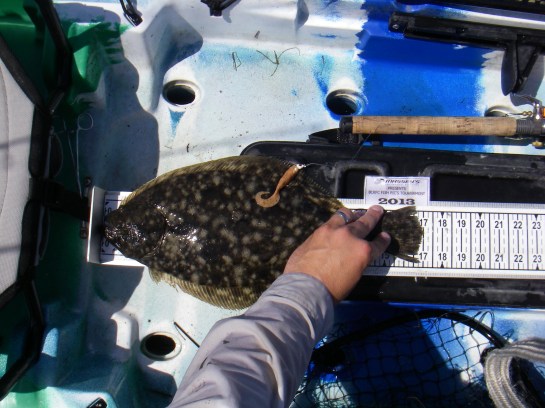
My flounder was caught while we were filming for Sportsman’s TV in June. It went 17″ and flopped in the water shortly after taking it’s picture, which was fortunate because I haven’t caught a bigger flounder since. Maybe I’m cursed after catching two monsters at Fall N Tide last year.

IMGP8146

The bass was an even bigger disappointment than the red. I caught it during a daytrip up to the Kisatchie National Forest. I thought I had a good shot at catching a nice bass at one of the lakes up that way, but all I could muster was this little guy, who went just a hair over 13″.

IMGP8289

Pretty embarrassing, but rules state they had to be caught on public water and I felt like this was the best place to get a monster and it didn’t pan out. I’ll have to spend a little more time on bass next year and hopefully find an even better spot.

What’s more embarrassing is that this was all it took to get 4th. You’d think that in a club with well over 300 members and the tournament being free this event would be a no-brainer for everyone, but it seemed to be the same core group of 20-30 competing with each other. Hopefully year two of the Massey’s Fish Pics tournament will be bigger and better and even more folks will compete – to me, if you have a kayak and fish in Louisiana, it’s worth the cost of a BCKFC membership ($25 last time I checked) to participate.

A thread on BCKFC spurred this post on, but one of the most important decisions when first starting out kayak fishing, that a lot of people overlook, is choosing the right sized paddle. I know when I bought my first kayak I used whatever paddle came with it. I really didn’t know much about paddling or that there were even different sizes of kayak paddles. I was just happy to have a paddle and a kayak because now I could go catch redfish in my own boat. Like a lot of folks that begin kayak fishing I was a fisherman first and a paddler second and I still am, but I at least know a lot more about paddling now. At the time I didn’t know how important it would be to become a good paddler in order to become a better fisherman. Paddling is a whole different topic for another day, but needless to say your paddle is the most important tool you have while kayak fishing so spend a little time learning about paddles to know what might be right for you. You want a paddle that fits you and your paddling style.

Luckily Aqua Bound has a website that will really help shorten that learning curve. Their Kayak Paddle Sizing Guide takes a lot of the guesswork out of the process and lays out a good foundation for the beginning paddler. The guide is an excellent starting point for finding the paddle that is perfect for you.

They use a 5 step process to help determine what paddle is right for you. Step 1 of the process involves determining the dimensions of your kayak. Most fishing kayaks these days are pretty wide, especially those that we can stand in. That will play into the size of your paddle – typically the wider the boat, the longer the paddle.

Kayak-Width-Sizing-Chart

Step 2 takes a look at you and your fitness level:

  • More athletic paddlers generally want a shorter paddle with a wider blade for the extra horsepower that it provides.
  • Heavier or taller paddlers generally prefer a longer paddle with a wide blade to move their weight efficiently.
  • Smaller paddlers, those who are not into speed or those with wrist or shoulder issues typically choose blades with less surface area; those that want more power and desire a bigger bite on the water go for larger blades.

Torso-Size-Sizing-Chart

On Step 3 you want to determine the type of paddling you plan to do and the length of your outing. Most of my paddling in Louisiana is typically flat water and can involve covering some distance. I’ve done 10-12 mile round trips that often require an entire day to do, the last thing I want is to be fatigued by the weight of a paddle when I need that energy to cover ground and fight fish.

Lakes and rivers

      • If you’ll be paddling on lakes and slow-moving rivers, and spending a fair amount of time in your boat, a touring kayak paddle would be a good choice. Touring paddles are the mainstay in kayak paddles and are good for day tripping, river-running, exploring and camping.
      • On the other hand, if you don’t think you’ll spend a lot of time on the water, you might think about a recreational kayak paddle. This class of paddles is ideal for short trips, fishing, exercise, and shore exploration.
      • When paddling in shallow water, a plastic blade will provide you more durability as the blades hits gravel, sand and rocks. Many paddlers feel in these shallow conditions that a wider blade provides more bite even with half of the blade out of the water.
      • If, on the other hand, most of your paddling is in deep water, your blade shape and material are really a matter of the kind of stroke you prefer. See the following notes on your style of paddling (Step 5).
      • A kayak paddle with an ovalized shaft (vs. a perfectly round shaft) will allow you to orient the blades without looking and will be easier to hold and less fatiguing.

Extended trips on flat or moving water, including sea touring:

      • Again, if you’ll be spending a lot of time on the water, look at Touring Kayak Paddles or Performance Kayak Paddles. Generally, as you move up the line in these types of paddles, the paddles will get lighter.
      • For long trips or for paddlers who suffer from sore shoulders, some experts recommend you choose a light weight paddle with fiberglass or carbon composite blades.
      • For those who find themselves often pushing off rocks, gravel and sandy bottoms, select a paddle with injection-molded blades made of nylon or polypropylene and typically reinforced with glass or carbon fibers. These paddles provide the perfect blend of weight and durability. P.S. A kayak paddle is not a push pole. It will like you more if you get out rather than bouncing on the tip of your paddle to get off the rock you’re stuck on.
      • True enthusiasts typically choose a paddle with a stiff, efficient and responsive carbon shaft. This dramatically reduces weight, allowing for longer paddling with less fatigue.

Step 4 breaks down the types of paddles Aqua Bound offers. I have been very pleased with their products and would recommend them to anyone looking at getting a new paddle. For kayak fishing you can’t go wrong with anything in their Ray series(Manta Ray, Sting Ray, Eagle Ray), which one will depend on your paddling style.

Performance Kayak Paddles

      High-tech paddles for the kayaking enthusiast who wants the latest paddling innovations.

      • Paddles are super lightweight to reduce their swing weight and lessen fatigue.
      • Blades are stiffer to deliver more power with each stroke.
      • Shafts are all-carbon.
      • Ferrules provide more feathering options.
      • Ergonomic designs and light weight materials reduce joint strain.
      • Different blade shapes deliver a different type of experience.

Touring Kayak Paddles

      Durable paddles that are still comfortable after a full day on the water.

      • Special nylon resins and blade designs make them extremely light.
      • Blades are often reinforced with fiberglass or carbon, enhancing paddle’s durability.
      • Shafts are available in a range of options from fiberglass to carbon.
      • Ferrules provide more feathering options.
      • Different blade shapes deliver a different type of experience.

Recreational Kayak Paddles

      For short trips with your family or friends, fishing or shore exploring, these paddles are a great choice.

      • The lower-end of this paddle category is the heaviest and least expensive kayak paddle.
      • Blades are typically injection-molded plastic resin and shafts are generally aluminum or fiberglass.
      • Ferrule is straight-forward without many frills.
      • Durable and economically priced.

Finally in Step 5 determine what type of paddler you are. Kayak fishermen tend to be more high-angle paddlers using more aggressive strokes to get from one spot to another. My first Aqua Bound paddle was a Sting Ray Hybrid and I loved it. I now own a Surge Carbon and love it as well, though I am not as rough on it as I was with the Hybrid. Blake has a Manta Ray Hybrid that seems to suit him perfectly.

High-angle paddlers

High-angle paddlers keep the shaft more vertical during their stroke (perpendicular to the water). These paddlers typically use a shorter, wider blade and a paddle with a shorter shaft. This more upright paddling style permits a more powerful, athletic stroke. Paddlers who prefer to use a fast cadence (whitewater, racers, touring with fast cadence) usually prefer this shorter shaft, wider blade paddle, too.

Low-angle paddlers

Low-angle paddlers keep the paddle relatively horizontal (parallel to the water). Paddlers who use this more relaxed, cruising stroke often find that a paddle with a longer, thinner blade is most energy efficient. In fact, this is the most common paddling style in North America.

Just like with kayaks, there is no sure thing and picking one is a personal preference. The more you try out the better you’ll feel when you commit to making a purchase. Most retailers will have different paddles on hand when they hold their demo days, so try out as many as you can to find your style and size. If you can’t do that at least you’ll have this guide so you won’t be throwing darts in the dark.

Bull red season is in full swing in Louisiana and the fly of the month for November should help you get one to eat, provided you make an accurate cast of course. It is Blake’s take on a Tim Borski classic, the Chernobyl crab, that he calls the Fukushima crab.

Materials:

  • Your favorite hook – I used a mustad 34011, size 2

  • Dumbbell eyes – pick a size suitable for your hook and the depth you wish to fish

  • Marabou

  • Deer hair for spinning

  • Hackle

  • Schlappen

  • Rubber legs

Step 1. Start thread, tie in dumbbell eyes and bring thread to the start of the bend.

IMG_1522

Step 2. Tie in a small amount of marabou about as long as the hook shank. Wetting it slightly makes it easier to handle.

IMG_1523

Step 3. Tie in a few strands of natural deer body hair on the underside of the hook. This should be the length of the entire hook.

IMG_1524

Step 4. Tie in a few pieces of flash on either side of the hook shank. Later trim this so that it is a little bit longer than the rest of the materials.

IMG_1525

Step 5. Tie in a hackle feather on either side of the shank. I like for them to splay out, but I’m sure they would be fine tied in the other way also.

IMG_1526

Step 6. Tie in a schlappen feather.

IMG_1527

Step 7. Cut, clean, and stack(even the tips) a small amount of deer hair, maybe ¾ of a pencil. We aren’t packing a popper here, so you don’t need a giant amount of material. Measure the tips to make a collar at the back of the fly and spin the deer hair around the shank.

IMG_1528

Step 8. Tie in a set of rubber legs with figure 8 wraps. I like to add a little super glue for durability..

IMG_1529

Step 9. Move thread forward of the legs and spin another clump of deer hair. No need to stack this one. I cut the tips off of it since I don’t need to form a collar which leaves less material to get in the way.

IMG_1530

Step 10. Tie in another set of legs.

IMG_1531

Step 11. Spin another clump of deer hair.

IMG_1532

Step 12. Tie in the last pair of legs right behind the dumbbell eyes.

IMG_1533

Step 13. Whip finish the thread and trim the body of the crab making sure not to cut the rubber legs, the schlappen feather, or the collar. I ended up trimming the collar on the bottom of the fly and leaving it on the top of the fly.

IMG_1534

IMG_1535

Step 14. Start the thread again and bring it behind the dumbbells. Palmer the schlappen up the shank and tie it in behind the eyes.

IMG_1536

Step 15. Dub the head with a little dubbing of your choice and whip finish the thread between the dumbbell and the eye. I like to trim the hackle on the top and bottom.

IMG_1538

Finished fly.

IMG_1543

The Borski Chernobyl crab worked a few weeks ago for Blake and Barret, so I would imagine the Fukushima would  have worked just as well.

DSC_1477

Enjoy.