A thread on BCKFC spurred this post on, but one of the most important decisions when first starting out kayak fishing, that a lot of people overlook, is choosing the right sized paddle. I know when I bought my first kayak I used whatever paddle came with it. I really didn’t know much about paddling or that there were even different sizes of kayak paddles. I was just happy to have a paddle and a kayak because now I could go catch redfish in my own boat. Like a lot of folks that begin kayak fishing I was a fisherman first and a paddler second and I still am, but I at least know a lot more about paddling now. At the time I didn’t know how important it would be to become a good paddler in order to become a better fisherman. Paddling is a whole different topic for another day, but needless to say your paddle is the most important tool you have while kayak fishing so spend a little time learning about paddles to know what might be right for you. You want a paddle that fits you and your paddling style.
Luckily Aqua Bound has a website that will really help shorten that learning curve. Their Kayak Paddle Sizing Guide takes a lot of the guesswork out of the process and lays out a good foundation for the beginning paddler. The guide is an excellent starting point for finding the paddle that is perfect for you.
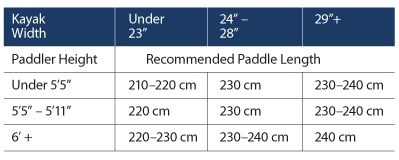
They use a 5 step process to help determine what paddle is right for you. Step 1 of the process involves determining the dimensions of your kayak. Most fishing kayaks these days are pretty wide, especially those that we can stand in. That will play into the size of your paddle – typically the wider the boat, the longer the paddle.
Step 2 takes a look at you and your fitness level:
- More athletic paddlers generally want a shorter paddle with a wider blade for the extra horsepower that it provides.
- Heavier or taller paddlers generally prefer a longer paddle with a wide blade to move their weight efficiently.
- Smaller paddlers, those who are not into speed or those with wrist or shoulder issues typically choose blades with less surface area; those that want more power and desire a bigger bite on the water go for larger blades.
On Step 3 you want to determine the type of paddling you plan to do and the length of your outing. Most of my paddling in Louisiana is typically flat water and can involve covering some distance. I’ve done 10-12 mile round trips that often require an entire day to do, the last thing I want is to be fatigued by the weight of a paddle when I need that energy to cover ground and fight fish.
Lakes and rivers
- If you’ll be paddling on lakes and slow-moving rivers, and spending a fair amount of time in your boat, a touring kayak paddle would be a good choice. Touring paddles are the mainstay in kayak paddles and are good for day tripping, river-running, exploring and camping.
- On the other hand, if you don’t think you’ll spend a lot of time on the water, you might think about a recreational kayak paddle. This class of paddles is ideal for short trips, fishing, exercise, and shore exploration.
- When paddling in shallow water, a plastic blade will provide you more durability as the blades hits gravel, sand and rocks. Many paddlers feel in these shallow conditions that a wider blade provides more bite even with half of the blade out of the water.
- If, on the other hand, most of your paddling is in deep water, your blade shape and material are really a matter of the kind of stroke you prefer. See the following notes on your style of paddling (Step 5).
- A kayak paddle with an ovalized shaft (vs. a perfectly round shaft) will allow you to orient the blades without looking and will be easier to hold and less fatiguing.
Extended trips on flat or moving water, including sea touring:
- Again, if you’ll be spending a lot of time on the water, look at Touring Kayak Paddles or Performance Kayak Paddles. Generally, as you move up the line in these types of paddles, the paddles will get lighter.
- For long trips or for paddlers who suffer from sore shoulders, some experts recommend you choose a light weight paddle with fiberglass or carbon composite blades.
- For those who find themselves often pushing off rocks, gravel and sandy bottoms, select a paddle with injection-molded blades made of nylon or polypropylene and typically reinforced with glass or carbon fibers. These paddles provide the perfect blend of weight and durability. P.S. A kayak paddle is not a push pole. It will like you more if you get out rather than bouncing on the tip of your paddle to get off the rock you’re stuck on.
- True enthusiasts typically choose a paddle with a stiff, efficient and responsive carbon shaft. This dramatically reduces weight, allowing for longer paddling with less fatigue.
Step 4 breaks down the types of paddles Aqua Bound offers. I have been very pleased with their products and would recommend them to anyone looking at getting a new paddle. For kayak fishing you can’t go wrong with anything in their Ray series(Manta Ray, Sting Ray, Eagle Ray), which one will depend on your paddling style.
- Paddles are super lightweight to reduce their swing weight and lessen fatigue.
- Blades are stiffer to deliver more power with each stroke.
- Shafts are all-carbon.
- Ferrules provide more feathering options.
- Ergonomic designs and light weight materials reduce joint strain.
- Different blade shapes deliver a different type of experience.
- High-tech paddles for the kayaking enthusiast who wants the latest paddling innovations.
- Special nylon resins and blade designs make them extremely light.
- Blades are often reinforced with fiberglass or carbon, enhancing paddle’s durability.
- Shafts are available in a range of options from fiberglass to carbon.
- Ferrules provide more feathering options.
- Different blade shapes deliver a different type of experience.
- Durable paddles that are still comfortable after a full day on the water.
- The lower-end of this paddle category is the heaviest and least expensive kayak paddle.
- Blades are typically injection-molded plastic resin and shafts are generally aluminum or fiberglass.
- Ferrule is straight-forward without many frills.
- Durable and economically priced.
- For short trips with your family or friends, fishing or shore exploring, these paddles are a great choice.
Finally in Step 5 determine what type of paddler you are. Kayak fishermen tend to be more high-angle paddlers using more aggressive strokes to get from one spot to another. My first Aqua Bound paddle was a Sting Ray Hybrid and I loved it. I now own a Surge Carbon and love it as well, though I am not as rough on it as I was with the Hybrid. Blake has a Manta Ray Hybrid that seems to suit him perfectly.
High-angle paddlers
High-angle paddlers keep the shaft more vertical during their stroke (perpendicular to the water). These paddlers typically use a shorter, wider blade and a paddle with a shorter shaft. This more upright paddling style permits a more powerful, athletic stroke. Paddlers who prefer to use a fast cadence (whitewater, racers, touring with fast cadence) usually prefer this shorter shaft, wider blade paddle, too.
Low-angle paddlers
Low-angle paddlers keep the paddle relatively horizontal (parallel to the water). Paddlers who use this more relaxed, cruising stroke often find that a paddle with a longer, thinner blade is most energy efficient. In fact, this is the most common paddling style in North America.
Just like with kayaks, there is no sure thing and picking one is a personal preference. The more you try out the better you’ll feel when you commit to making a purchase. Most retailers will have different paddles on hand when they hold their demo days, so try out as many as you can to find your style and size. If you can’t do that at least you’ll have this guide so you won’t be throwing darts in the dark.