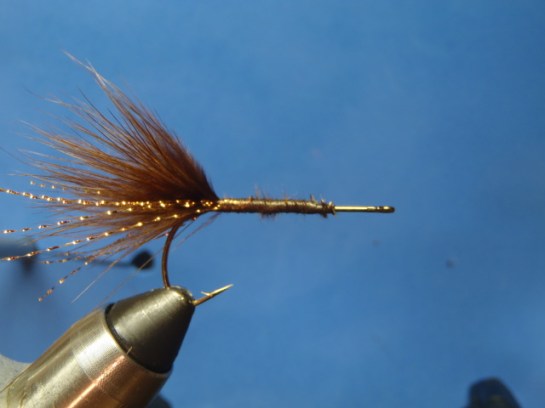
Bow River Bugger variant
Going international for this month’s FOTM. Here is a pattern that originated on the Bow River in Alberta, Canada, but has a found a home in many fly boxes across North America. The Bow River Bugger is the offspring of a woolly bugger and a muddler minnow. It was originally tied by Peter Chenier in the 80’s, this is Blake’s version of the fly.
Materials:
Hook: Bass Bug Stinger, Size 2 used
Thread: 6/0 brown and 50 denier gsp.
Tail: marabou with some flash
Body: uv dub, hackle, gold rib
Head: deer hair
1. Start thread ¼ to 1/5 the length of the shank behind the eye of the hook. This will be our reference point to where our collar will be. I like to err on the side of a shorter head.

2. Tie in marabou about the length of the shank. Wrap the butts all the way to the index point behind the hook eye. This makes for a more level, less lumpy body, especially at the point above the barb where a lot of material will be tied in.

3. Tie in a couple strands of flash on either side of the hook.
4. Tie in the gold ribbing and hackle by the tip leaving the tag ends of both extending to the index point. Wrap over the tag ends to make a smooth body.

5. Dub a body to the index point.

6. Palmer the hackle to the index point. I like a good many wraps of hackle, but it’s up to the tyer. Do whatever suits your situation.

7. Counter wrap the wire and tie it in at the index point. Be careful not to use too many wraps at the index point, don’t want it to be too bulky.

8. Here I whip finish my 6/0 brown thread and switch to 50 denier gsp to spin the deer hair head. Start the head by cutting a decent clump of deer hair and align the tips using a hair stacker. Once aligned, hold the bundle with the tips facing toward the back of the hook. Push the eye of the hook into the middle of the clump while holding the hair with your right hand. Once the tips reach the desired length of your collar, grip the hair with your left hand and make two loose wraps around the hair. Then pull the two wraps tight to flare the hair forming the collar. I like to keep the butts long so I know when I’m getting close to the collar when trimming.

9. Bring the tread to the front of the spun hair. I want a fairly loose head on this fly so I didn’t use a hair packer. Spin another clump of hair using the same process as before. I only use two bundles of hair on this fly, but if I want one that floats a little better, I will normally do 4 clumps of hair packed real tight.

10. Bring the thread directly behind the eye and whip finish the thread. Being that I am using white gsp, I used a permanent marker to color the thread to match the color of the fly. Trim the fly to the desired shape. I normally go for a bullet shaped head stopping at the hair tip collar. Finished fly, enjoy.

UPDATE: Blake fished this fly on a local river last week. Just as suspected, it catches spotted bass.


